Sub-Total: $0.00
Bromeliads- Colorful and Simple
The Bromeliaceae is a family of monocot flowering plants of 75 genera and around 3590 known species native mainly to the tropical Americas, with a few species found in the American subtropics and one in tropical west Africa, Pitcairnia feliciana.
Bromeliad species can either be terrestrial (grown in soil) or epiphytic (clinging to trees and absorbing nutrients through their leaves), but when grown as houseplants, both types are usually grown in a porous, well-draining potting mixture. As a general rule of thumb, bromeliads will thrive in the same conditions as epiphytic orchids. However, they are considerably more tolerant than orchids of fluctuations in temperature, drought, and careless feeding.
Included in this Blog are just a few Bromeliads species. There are many more based on hybridization and country.
Common Name Bromeliad
Botanical Name Bromeliaceae genera
Family Bromeliaceae
Plant Type Perennials; family includes both epiphyte (“air plant”) and terrestrial species
Mature Size Varies by genera and species
Sun Exposure Bright, indirect light
Soil Type Fast-draining potting soil
Soil pH 5.0 to 6.0 (acidic
Bloom Time Blooms once; timing varies
Flower Color Red, green, purple, orange, yellow
Zones 10-11 (USDA); usually grown as houseplants
Native Area Tropical and subtropical Americas
The unusual appearance of the bromeliad would seem to indicate that the plant is high maintenance and requires special gardening skills. The plant is prized for its thick foliage that grows in a natural rosette. Near the end of its life, a bromeliad plant may produce an inflorescence, or flower. whose form and color vary widely among each variety. The wide leaves are sword shaped or scoop-like and grow around a central “cup.” This cup catches water in the plant’s habitat. Bromeliad plants are often epiphytic and cling to trees or other structures. They are not parasitic but simply use the structures as perches from which to gather sun and moisture.
How to Grow Bromeliads
These plants are widely available at nurseries and garden centers. The plants need medium to bright light as indoor specimens. New gardeners learning how to grow bromeliads will find that the plant doesn’t need deep pots or thick potting soils. They do even better in shallow pots and may grow in low soil mediums such as orchid mix, a blend of bark, sphagnum moss and other organic amendments. How to Care for a Bromeliad Plant Bromeliad plant care is easy and requires no special tools or fertilizers. Feed the plants with a half strength fertilizer every month in the growing season. Water needs are easily met by filling the cup at the base of the leaves. The water that collects in the pot should be emptied out weekly to remove debris and dead insects that stagnant water tends to lure into the cup. Set the pot in a saucer of gravel filled partially with water to increase humidity and help provide a moist atmosphere. Make sure the roots are not submerged in the water or this might invite rot.
Some bromeliads grow well as “air plants,” which are glued or nested onto logs, moss or other non-soil organic items. You may have seen Tillandsia plants wired onto coconut shells with no soil. These plants collect all the food and moisture they need with their leaves but need a little help from you in the indoor setting.
Bromeliad Life Cyle
Growing a Bromeliad Pup don’t label yourself a black thumb if your bromeliad plant begins to die within a year or two. These epiphytes are not long lived but will generally start to die back after flowering. Although interior bromeliad plants will fail after a while and cease growth, they will produce offsets, or pups, that you can remove and start as new plants. Watch for pups at the base of the plant and nurture them until they are large enough to break away from the parent plant. To remove them, cut them away from the parent and then plant them in sphagnum moss mix or any well-draining medium. Then sadly, it’s off to the compost pile with the original bromeliad plant, but you will be left with a little carbon copy that you can tend to its full maturity when the cycle starts all over again. These baby bromeliads require the same care as the parent plant. As soon as the pup forms a cup, it is important to keep it filled with water, so the new plant receives adequate moisture. Growing bromeliads is a rewarding hobby that can continue for years if you harvest the pups.
Tip
You can force a bromeliad to bloom by draining any water from the plant if it’s growing in a container, placing a plastic bag over it and inserting a ripe apple inside, which produces ethylene gas. Remove the bag after a couple of days, and the bromeliad should begin blooming in six weeks to approximately three months.
Life Cycle
Bromeliads bloom once and then begin their cycle of dying, which can take up to two years before the mother plant finally turns completely brown and dies. However, the mother plant develops pups during this time, and they take around a year to develop into full-size bromeliads. For aesthetic reasons, you can pull up the mother plant once it begins to brown and die, or leave it in place in the landscape, as the pups will eventually fill in the area. After the pups are around six months old, or about half the size of the mother, you can cut them off and repot them in a container or replant them in the landscape. –
Problems
In the home, plant diseases are rarely a problem. Too much or too little water plus insects and mites are the main problems. Root rot usually results from a soil mix that does not drain quickly or overly frequent watering. Scale and mealybugs are the most frequent insect pests of bromeliads.
—————————————————
Aechmea
Many Aechmeas have sharp spines along the margins or outer edges of their leaves. The Aechmea genus contains 255 different species that originate from throughout Central and South America. Some have adapted for growth in moist, shady forests while others prefer more arid regions. Aechmea bromeliads offer a great variety in color, foliage, and growth habits. They are especially easy to care for and reward their owners with bright, long-lasting inflorescence.
Most Aechmeas are epiphytic meaning they grow non-parasitically on another host such as a tree. However, they are often sold as potted, terrestrial plants in nurseries and flower shops. While they can grow well in pots, their root systems are not large. In the wild, Aechmea’s roots merely act as an anchor attaching the bromeliad to the host plant. They take in water from rainfall and nutrients from dust, insects, and other particles that have collected in their tanks. It is common for Aechmeas to become top heavy. Their foliage is large and meaty yet their small root systems prefer small 4-6 inch pots.
- Aechmea fasciata: This commonly available funnel-shaped plant has leaves that are curved at the top and numerous light blue flowers borne in a dense pink spike.
- Aechmea fendleri: A large panicle of blue berries and almost purplish bracts top a 24 -to 30-inch rosette of light green leaves.
- Aechmea ‘Foster’s Favorite’: Upright rosette with striking lacquered wine-red leaves; pendant spike of coral red pear-shaped berries tipped with midnight blue flowers.
- Aechmea chantinii: Colorful open rosette of hard olive green leaves with pronounced pinkish-gray cross bands. The flower stalk is a branched spike with tight red bracts tipped yellow.
Ananas
Ornamental pineapples are large plants with leaves that can reach three to five feet long. They require strong light, rich soil, regular feeding, and plenty of moisture. The plants have dense rosettes of spiny leaves from which the flower develops to produce a typical pinecone-shaped fruit. Pineapples can be propagated from pups at the base of the plant or by planting the topknot of the fruit. There are several different colors and leave shape as well.
Crypyanthus
The name Cryptanthus is derived from the Latin word crypt meaning “hidden” and the Greek word anthos meaning “flowers”. The name is not completely accurate. The small, white, stemless flowers are far from hidden; they might not be flaunted like those of a Guzmania or Aechmea, but perched in the middle of a relatively flat plant they are far from hidden. Their nickname, Earth Stars, is probably more descriptive. Most species are small monolayered plants with little leaf overlap; they look like twinkling stars.
The first Cryptanthus species were discovered in eastern Brazil about 1831. The first documented hybrid, Lubbersiannaus ( bivittatus X bahianus or beuckeri ), was made by Jacob-Makoy in 1884. Although Walter Richter did some work with Cryptanthus in the 1930’s, and Mulford Foster in the 1960’s, the genus was more or less ignored until the 1970’s when Hummel in the United States and Grace Goode in Australia kicked off a hybridizing frenzy that continues to this day.
- Cryptanthus bromelioides var. Tricolor: The beautiful foliage is striped, white on green.
- Cryptanthus ‘It’: White-and green-striped leaves are tinged pink on plants grown in bright light.
- Cryptanthus fosteriana: This earth star has chocolate-brown leaves with zebralike gray stripes.
- Cryptanthus zonatus ‘Zebrinus’: ‘Zebrinus’ has reddish-brown leaves with silvery zigzag bands.
- ‘Black mystic’ has deep maroon to almost black foliage; the leaves are stiff and fleshy.
Guzmanias
Guzmanias are more sensitive than many other bromeliads. They need moderate light, stable warm temperatures, and constantly moist air. To ensure success, maintain high humidity, and good air movement. The hybrids are generally easier to grow than the species and are usually more spectacular.
- Guzmania lingulata: The flower stalk grows out of the rosette of leaves and has bracts ranging in color from yellow to orange to red to deep purple. Many color variations have been selected and named. G. lingulata and its hybrids are easy to grow.
- Guzmania zahnii: This air pine has a brilliant red and yellow flower stalk. It is easy to grow, but some of the hybrids developed from it are more challenging.
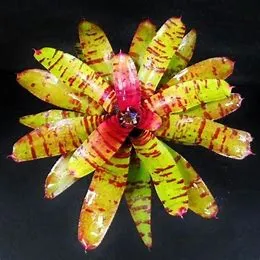
Neoregelia
Blushing Bromeliad or Fingernail Plant – Neoregelias are spectacular foliage plants. They provide riots of color with their green, bronze, yellow, orange, red, purple, pink, and white leaves. The colors often change when the plants begin to flower.
Neoregelia do best when underpotted and underfed, grown on the dry side in strong light. Frequent fertilization or too little light will cause the leaves to turn green. Keep water in the cup.
- Neoregelia spectabilis: Leaves are narrow, gray-striped beneath, green above with red tips. The inner leaves are edged in purple with blue flowers.
- Neoregelia carolinæ: When in flower, the leaves turn red, attracting insect pollinators. In its natural habitat, this plant is often used as a shelter by many animals, including frogs.
- Neoregelia ‘Guinea’: This highly speckled bromeliad is a small grower at about 6 to 8 inches in a compact, somewhat upright rosette
.
- Neoregelia Blushing triger’: Neoregelia Blushing tiger is one of the best choices for landscaping. It gives a stunning display when planted in bunches. Its contrast and red stripes all over with dark red center make it’s a sought after neo in landscaping as well as just potted plant.
- Neoregelia ‘Morado’: A wide-leafed purple-centered plant that will reach maximum color in low light conditions. The deep green, white-edged leaves flush when in bloom. In intense light, it develops dark concentric bands.
Tillandias
Air Plants (Tillandsia species): Tillandsias are the largest group of epiphytic bromeliads. They are twisted wiry plants whose leaves are covered with silver-grey scales. Some have plain green leaves. Several have bright pink flower stalks and blue, purple, red, orange, or white flowers. The leaves flush red on flowering plants.
- Tillandsia cyanea: This is the most popular species of air plants. Striking pink quill-like bracts surround large, bright purple flowers. The foliage of this terrestrial species is a mass of thin, recurved green leaves in a rosette form. Easily grown indoors in bright, filtered sunlight. It needs moist soil and can be mounted on branches if moss is used at its base.
- Tillandsia caput-medusae: This easy to grow, clumping species has silvery twisty leaves and a bulbous base. The flower stalk is red.
- Tillandsia plumosa: This plant forms a ball of fuzzy silver leaves that grow on rocks and limbs in dry forests.
- Tillandsia usneoides – Spanish Moss: Spanish moss is native from the coast to the lower piedmont in South Carolina. The slender stems hang to 20 feet or more over trees, fences, and telephone wires. It can also be grown indoors in bright light.
- Tillandsia utriculata v. pringleyi: A decorative species with rather thin, grayish silver leaves in an upright rosette. The flower stalk is branched and red to orange or pink, with green.
Vrieseas
Vrieseas are large bromeliads, and may reach 2 to 3 feet or taller as houseplants. Many have exotically patterned and colorful, spineless foliage. Others have solid green, soft leaves. They flower in late winter with brightly colored flower spikes that last several months.
Vrieseas are epiphytes. They have shallow root systems and should be kept relatively dry. They are much like guzmanias in their cultural needs. Give them moderate light, stable warm temperatures, and constantly moist air. They may be fed through the leaves with very dilute liquid fertilizer.
The soft, green-leafed species and their hybrids prefer more moisture and shade, while plants with banded or silvery leaves should be grown with less water and more light.
V. flammea: Red flowers, recommended for beginning bromeliad growers.
- V. carinata: Compact, has a flat flower stalk, with yellow, orange, or red bracts. It has been used to produce many hybrids.
- V. bleheri: Green leaves shaded purple and bright yellow bracts.
- V. guttata: The green leaves are spotted brown. Pendulous flowers lined with pink bracts.
- V. saundersii: Compact, has beautiful silver-grey leaves.
- V. fenestralis: has yellow-green leaves marked dark green.
Hybrid Vrieseas:
- Christianne’: Glossy green leaves with bright, waxy red spikes and yellow flowers. Rarely exceeds 12 inches.
- Splenriet’: The dark green leaves are marked with wide purplish-black bands. Bright yellow flowers emerge from a vibrant red-orange spike.
- ‘Charlotte’: An excellent plant with a colorful branched spike of yellow, with a little red. They can grow to 18 inches tall or so but will stay smaller if grown in a small container
Care
Bromeliad Bloom Looks Like It’s Dying?
So your bromeliad bloom turned brown? Well, it might sound harsh, but once your bromeliad bloom has begun to die, you can cut it off! Bromeliads are known for their exotic, long-lasting flowers. These tropical plants can bloom for months, in fact. However, once a bromeliad’s flower begins to die, it is signaling the next cycle in its life. This next cycle is producing pups. Pups are new bromeliad plants, which will be the future generation of your bromeliad garden. By cutting off the bromeliad’s dying flower, you can help the plant refocus its energy on these new pups.
How to Remove a Spent Bromeliad Bloom?
To remove a spent bloom, use a sharp, sterilized blade and cut the bloom stalk. Make a clean cut as close to the remaining plant as possible without harming it. Once you’ve removed the bloom, you can toss it in the trash or compost. Don’t neglect your bromeliad just because it finished blooming. Now comes the exciting part where it will begin to produce pups. For more information on how to identify bromeliad pups, remove them from the mother plant, correctly pot them, and care for them
Once your bromeliad is finished producing pups, it will eventually die. Don’t be alarmed if suddenly your bromeliad plant isn’t looking too well, despite your best efforts to keep it healthy. This is just a natural progression in your plant’s life cycle. By now, your new pups will have been re-potted in their own containers and will soon be featuring new blooms and beautiful colors.
WHAT IS A BROMELIAD PUP?
A pup is the offset of another bromeliad plant. Pups can form at any time, but this most often occurs after your bromeliad has bloomed. Once a mature bromeliad reaches the point where it has a healthy bloom and a strong core, the original plant (known as the mother) will stop producing leaves and will begin producing its next generation of plants. Pups will not reveal a bloom at this point but you will be able to identify the cup forming as it grows upward from the base of the mother. It is possible for the mother plant to have multiple offsets growing at the same time. When these pups reach a certain size they can be harvested, planted, and cared for on their own. The mother will continue to thrive and produce additional offsets for the next year or two.

WHEN AND HOW TO REMOVE BROMELIAD PUPS
The longer the pups are left attached to the mother plant, the faster they will reach their own maturity. By leaving these offsets attached, they are able to take in nourishment from their mother, expediting their growth. However, removing the pups when they are smaller will allow the original bromeliad to focus the entirety if its energy on throwing even more pups. The choice on when to harvest is yours depending on your intentions. Bromeliad pups can be safely removed when they are 1/3 to 1/2 the size of the mother plant. Another good indicator that the offsets can survive on their own is the presence of roots. Root formation is not necessary for a pup to survive so don’t be alarmed if they don’t exist yet. Use a sharp, sterilized knife or scissors to remove your new plant, cutting as close to the mother plant as possible without injuring it. Sometimes there will be an outer leaf shielding the base of the pup. You can gently peel this leaf away to reveal the entire base. Once the pups have been removed, simply replace the soil around the mother plant and it should continue to provide you with additional offsets.

HOW TO POT BROMELIAD OFFSETS
After the pup has been harvested from the mother, dip the cut ends in a fungicide and rooting hormone before potting it individually. Prepare a small 4” plant pot with a light, well-draining medium. Because a pup’s root system is limited or non-existent, you may fi nd the plant to be a little top heavy with nothing to anchor it down. When placing your new plant in within the pot take care not to set it too deeply in the potting mix in an effort to support its weight. Instead, use wood sticks or stakes to hold the plant up until it produces a root system that is able to withstand its own weight.
CARING FOR PUPS
Light, warmth, and humidity are three important factors in growing healthy bromeliads. While newly potted pups enjoy bright indirect light, they require less light than full grown, mature bromeliads. Be sure to keep the new plants watered. It is best to keep the potting medium moist but not wet. Over-watering bromeliad pups can cause rotting at the base of the plant, which could lead to a low chance of survival at this critical stage. As the plant becomes stable with its roots system you can remove the supports and allow it to start receiving more light. Provide the plant with some good light in the morning especially during the summer months. Shade for the rest of the day after the morning sun usually leads to a good bloom on a bromeliad. Taking a bromeliad from the pup stage to full maturity is incredibly rewarding. It’s a process that can be repeated over and over and takes approximately 2-3 years. With the proper knowledge and care, bromeliad propagation can be a great way to build your collection.
#bromelaid #tropicalflowers