Sub-Total: $0.00
Stumpery Gardens Beauty and Biodiversity
A stumpery is a garden that uses tree stumps and logs as an organizing feature. Find out more about its history and how a stumpery could become part of your home garden.
One of the first documented stumperies was at Biddulph Grange in England, designed in 1856 by estate owner James Bateman with input from his artist friend, Edward William Cooke. (Bateman was a wealthy horticulturalist, who exemplified the Victorian passion for collecting plants from around the world.) The stumpery caught the imagination of the Victorian gardener and was emulated throughout England. One of the most famous stumperies was created by Prince Charles of Wales and is still a featured part of the gardens at Highgrove, his home in Gloucestershire.

In the 1900’s Stumperies fell out of fashion, but they are starting to make a resurgence with the increased interest in shade gardening.
Traditionally, the stumpery is a planned arrangement of unearthed tree stumps. The goal is to make it look natural or at the very least, very artistic. Getting large stumps as seen in some of these pictures is difficult today, and so they are now replaced with logs and drift wood. Any wood that is at hand can be used, but the more architectural they are, the better. And old is much better than new.
The wood pieces are set in a pleasing arrangement so they form lots of nooks and crannies which are filled with soil and then planted. Ferns are an obvious choice, but even smaller hostas and other woodland plants can be used. Add a few snowdrops and scilla for an early spring bloom.
As stumps gradually decompose, they go beyond merely serving as garden architecture. Peeling bark will provide a habitat for insects that will feed birds or pollinate plants in the garden. Small mammals, lizards, and frogs can take refuge underneath. Colorful mushrooms or other fungi may eventually grow and add more character to the wood.
Stumperies can be large or small. They can consist of several unearthed trees or can simply make use of logs or driftwood. The source of the wood and choices of plants are individual choices. The beauty of a stumpery is that the architecture provides a varied environment for plants and will evolve along with them.

Selecting the Perfect Spot for a Stumpery
There are no right and wrong place to put a stumpery, but the following will give you some guidelines.
These garden look best in shade or part shade. This makes them suitable for ferns and other woodland plants and it reduces weeds.
If you already have an old tree or tree stump, the base of these are ideal.
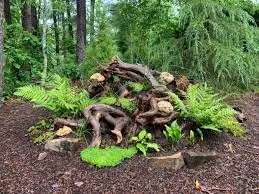
Stumpery root sticking out of the ferns
A slope is a great place for a stumpery because you can see to the back pieces of wood without the need to get really big ones. If you don’t have a slope, don’t worry. Just place smaller pieces near the front and larger ones at the back to make it look like you have a slope.
Many of the plants that will do well like a very humusy soil. If you don’t already have this, consider adding organics like peat moss and compost.
Building the Stumpery
Start by removing any plants from the area, including weeds. It is much easier to work without plants than to try and work around them. Amend the soil if it is needed.
Placing the Wood
Gather your wood. You can use just about any wood here. If you don’t have any, talk to an arborist and see if they can give you some cut offs from a tree trunk. If you are near a beech, look for driftwood. Even a log or two from a local forest will make a great addition.
Gather all of your wood before starting the project, even if you have to wait a while to get it. It’s much easier to do it all at once than over a period of weeks or months.
Take all of that wood and arrange it in a pleasing way. Keep large stuff to the back of the bed. Look at each piece of wood and decide which should be the front. The most interesting side should face you visitors.
There are no rules here, but I like a more natural look. So I try to hide any parts that look manmade, like the straight cut from a chain saw. I want the more natural, broken ends facing the front.
Bury parts of some to partially hide them. This is especially important if your pieces all look the same. Make each one face a different direction. It is amazing that you can take two identical logs and make them look very different just by laying them down differently.
Try to create pockets that you can fill with soil. This will give you various heights for planting even if your ground is level.
Every few minutes, take a step back and look at your creation from various angles. What does it look like to the garden visitor? If you were a toad, can you see a nice place to hide? Then move things around to make it look better.
Here is a good suggestion. Don’t finish this part of the project in one day. Even when you think you are done, sleep on it and have another look in the morning. After a bit of a break, you will see things differently.
Adding Soil
Add soil to fill in any pockets that you have created. Ideally you will have various levels of soil. In effect you have made a bunch of mini-raised beds with the pieces of wood.
Use topsoil, so it does not settle too much.

Adding Moss
You don’t have to add moss. In some climates it will find your stumpery even if you don’t want moss. In other locations you might want to add some yourself.
I think moss is an important part of this garden. A bare log is not nearly as interesting as a moss covered one.
The moss does one other important thing. Right now your garden has that sparkly new look. Add some moss and the whole thing ages by many years and that is the look you are going for.
How do you add the moss?
There are many online suggestions about blending up a moss, milk, yogurt smoothie and painting it on. This method does not really work well except in very humid areas.
You can tie sheets of moss on with string or fishing line. This works well. Once the moss clings to the surface on its own you can remove the sting. I have not tried this next one yet, but you can glue it on with crazy glue, which is water soluble.

Planting
Now add your plants. Ferns look great here, but you can add whatever you want. If you already have a shade garden, split some of your favorite plants and use them.
The only caution I would make is that when the plants are fully grown, you still want to see some of the wood. You always want to see your creation. Large hostas are OK if you have tall pieces of wood. If not, then stick to smaller hostas. The same goes for other plants.
Water it all in and wait for things to grow. The moss will grow faster if you water it regularly, but once it is established, it does not need any special care.